By: Rico Zook
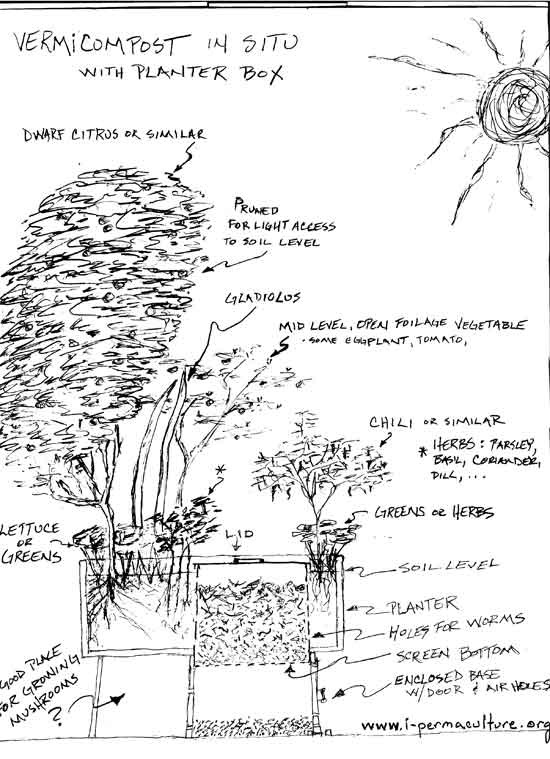
This is a vermicompost design with an urban application in mind. The idea being to get the benefit of vermicompost while also having the worms service a planter box that produces food. In ranging throughout the soil of the planter box the worms will be moving some of the nutrients from the compost out into the soil. In this it is likely that there will be no need to add compost or nutrients to the planter box, thus reducing your work. And, the plants in the box should be quite healthy and productive due to this importation of nutrients via the worms. Vermicompost is said to be up to 20 times more potent than regular compost. I suspect part of this is in the amount of micro-organisms associated with it, and that the nutrients are in a much more assimilable form.
Generally there is resistance to doing a vermicompost system in a urban setting due to worries of smell, and thus the attraction of vermin. This is a legitimate concern in crowded housing and general having a healthy environment. However, if one has and maintains a properly functioning system smells will be minimal to nonexistent. With this there will be little to no attraction pulling in any vermin.
I have not built nor worked with a system like this. Fundamentally there is no reason this will not work. People have done what is referred to as worm tractors, where a bottomless container is put into the garden. This acts as a vermicompost bin that the worms roam in and out of. This keeps them in proximity to the production plants where they import nutrients from the added food scraps in the container.
I do not know if anyone has done a design like this before; however, I would not be surprised if they had. The unknown for me with the design I present here is the fall through. I did this in hopes of removing the need to harvest the compost from the bin, thus making this almost maintenance free. Any production system we design and wish to maintain at optimum production levels will have some form and frequency of maintenance. The question is the amount of work necessary to maintain this optimum level.
SYSTEM DETAILS
As this is a fall through design it promotes the need to have this lower area enclosed to protect the compost from drying and losing nutrients, as well as keeping the general area looking nice. In the drawing I have holes in this lower enclosure. I now think it best not to have these to further protect the vermicompost. If this fall through does not work, or for other reasons you decide you need to clean out the compost box, simply let it dry out and the worms will stay in the soil, thus making it easy and quick to clean or harvest the finished compost.
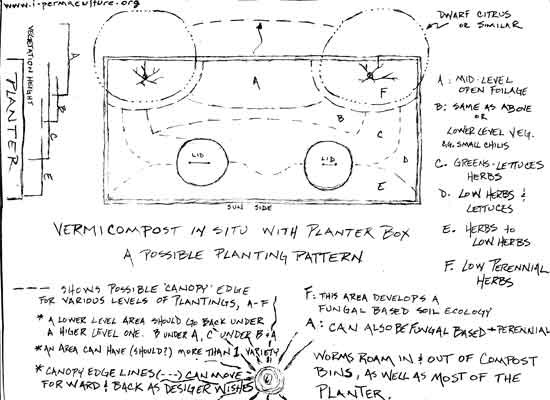
This design shows two compost containers, however, you can scale this to whatever number and size you want, from one to multiple boxes. The important thing will be to have an appropriate ratio of soil area per vermicompost box. This will not be a precise ratio and likely has a fair bit of leeway with it. The important thing is not to have too much soil area to box ratio, thus limiting the benefit to the plants from nutrient importation. If this is the case then you’ll have to add nutrients yourself. If the planter box is too small, low soil area to box ratio, then you’ll lose production potential and likely have to harvest the worms themselves sooner as there will be less room for a larger population.
The lid should fit tight so odors do not escape and rats cannot open up. With a properly functioning vermicompost system odors will naturally be minimal to nonexistent. However rats do like to eat worms so you must protect it from these. With minimal to no odor rats will not be so attracted anyway.
Please note the solar orientation. This is critical in terms of planting pattern and solar access for all the plants in the box. As with all Permaculture cropping work towards complexity, both in plant varieties as well as structuring the planting pattern in three dimensions.
The biggest challenge I see to this system is its actual construction. I have a strong preference for systems that are easy to construct as they are usually easier to manage and more economically accessible to more people. This in situ fall through system will require a bit of skill to build, as well as some money for the materials. This in itself might promote the alternative of an accumulation variety of bin rather than a fall through type as it will be much easier to construct.
In this accumulation bin system the bottom of the bin either opens on to the soil of the planter, or is solid. Either of these types would still have some holes in the sides to allow better and multi-level access for the worms.
SYSTEM VARIATIONS
VERMIWASH
It would be possible to have a vermiwash system rather than a straight composting one. This is where you get a liquid vermicompost solution rather than the compost itself. At one point you will need to dry out the bin and remove the accumulated compost. It will still be great to use in your garden, it will just not be as nutrient rich and strong as unwashed vermicompost.
To make this vermiwash system the bottom of the vermicompost bin needs to be solid and have a drain or spigot. Inside the bottom of the bin would be gravel (3 – 5 cm), on top of which would be pea gravel. On top of the pea gravel would be some landscape fabric, also know as weed barrier.
Old jute, burlap, or hessian bags could also be used, though these will eventually decompose, perhaps necessitating its replacement if compost starts to fall to the bottom. The idea is to have a reservoir at the bottom to collect the wash and keep the above compost getting too saturated, as well as making it easy to drain the wash out.
There will be the need to wait awhile when you first start this system so the compost can build up some. You’ll also need to assess the extraction rate that fits the worms’ compost production rate.
ALTERNATING BINS
If you choose to have the bins not have a screen at the bottom, e.g. the accumulation bin variety, you can utilize an alternating bin process if the planter has more than one worm bin. In this you would add scrap to one bin only until you decided to shift to filling another bin in the same planter. This switch could happen due to you wanting to harvest finished vermicompost from the first bin, or perhaps your production rate of materials for the bins necessitates an alternating pattern of bin additions, be it every other day or shifting once every few days. If you have more than one planter bed with vermi-bins you could also use this system.
Overall I think this alternating process likely the best even if you are doing a fall through style.
IN THE GARDEN
This accumulation vermin-bin system can also be used out in your regular kitchen garden, as well as any other plant production system. We could well call this a worm cultivator (referring to both soil and worm cultivation), and will be of great benefit in annual or perennial systems, as well as in sunken, ground level or raised beds. If anyone builds and works with this I would love to hear about it, as well as receiving some photos.


